Friday, September 28, 2012

Outboard Bracket Complete?

I am now substantially done with the outboard bracket.  Here are a few progress photos.


In my last post, I realized that the Tilt/Trim would be subject to swell action, so I decided to mount the unit on a "hinge".  I couldn't find any "c" channel in the remnant section, so I bought 2 pieces of "L" shape and had them welded together.


Here is the bracket I had welded.  In this picture, it is bolted to the CMC Tilt/Trim so I can position the "hanging" brackets

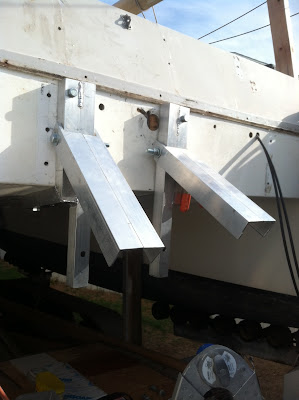
The "hanging" brackets are installed and the whole unit pivots pretty well.  I had to carefully extend the pivot point of the CMC Tilt/Trim to each of the brackets, so that there is only one rotating axis.


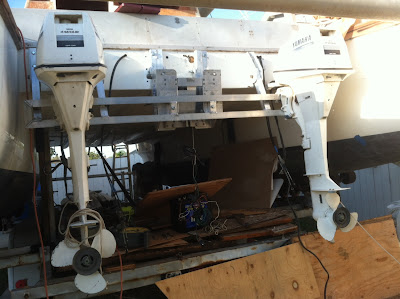
Here is a picture with the outboards loaded.  Really the only thing left to do is add mounting plate for each of the outboards.  I will likely make it out of starboard.


I was considering, rigging the outboards to turn with the rudders, but the outboard arm is hitting the hanging brackets and will not likely be able to rotate the 35 degrees I am considering for the rudders.  Oops.  Had I thought about it, I would have moved the inner hanging brackets more toward the center and would have had enough room.  I will live with it the way it is!


....and in the up position.  They can actually tilt 90 degrees, but I will only tilt them enough to get them out of the water.  I will likely fabricate an angled "swell" shield to help protect the Tilt/Trim and the outboards from the water.

BTW... I tried to manually tilt the whole bracket system to replicate a swell hitting it and to test the "hinges".  I had to lay down on my back and use my lets to barely budge it, so the "hinges" I installed are probably going to just be a last defense against the whole unit being ripped away.

Now I am going to turn my attention to fabricating the extension of the stern that will cover the outboards.  I am also likely to relocate the gas tank from the port/aft storage to in between the 2 out boards, thereby moving the weight slightly forward.

Saturday, September 8, 2012

Tilt / Trim Installed

I found a local welder.  He charged me $35 to weld the bracket for the CMC Tilt/Trim, which I thought was quite reasonable.


Brackets Installed


CMC attached.  OK. I immediately see a problem I didn't think about.

Even though the previous sleds hung below the stern, they were hinged, so any swells could push up on the sleds/outboard if needed.  As installed, the CMC is static so I have two choices.  Rethink the bracket with a hinged design or fabricate a deflector forward of the bracket to deflect swells.


Here is a picture of the previous setup for comparison of the exposed area.


Now that I think about it, I am leaning toward leaving the bracket and then attaching the CMC to 2 pieces of "C" channel  to create a hinge.  I will go with a thicker profile channel, so there is less chance of shear.   Heck maybe I will also fabricate a deflector so the swell does not have a flat surface to run into!

Yeah...that's the ticket!

Update 9/9/12

I decided to mock up the outboard bracket that will straddle the CMC Tilt/Trim out of wood.  I will then build it out of 1.5" square tubing as well, therefore there will be less surface area for a swell to hit.


Here is a close up of the corner.  I will likely reuse 2 of the sled hinges from the previous install.  1.5" square tube fits just right (the piece there is just shown for reference)


While I was waiting for the "backing plates" for the brackets (which I fiber glassed in place) to cure, I decided to cut out the window at the helm.


This picture is with the glass installed.  Since it is a sun roof for a car, it only opens about 3 inches.  However it is really easy to remove it at the 2 hinge points.


Looking through the glass up close.  Even though you can see through it pretty well, I will likely remove the glass while underway.


The rest of the windows are supposed to be shipped out at the end of the month.  Can't wait!

Sunday, September 2, 2012

This and That

I have basically just been piddling around the last week.   I came up with a bracket to hang the CMC tilt/trim.  The top 3 inches or so of the CMC will be above the bottom of the stern, while the rest will hang below.   The bracket will be bolted to the stern as well as under the deck.  I am using 1.5" square aluminium tube.  


Waiting for quotes from local welders.  I hope to find a good/reasonable welder as I am sure I will need more done.  It's actually one of the skills I want to learn, but at this point it will probably have to wait until after the boat is splashed!

In the meantime I have taken care of a few odds and ends.  I cut out the holes on the inside transom for 2 hatches, so I can access my future batteries.  It will also aid in placing backing plates for the CMC brackets.


I did cut through some wood "bracing" that does not appear to be structural, but I will just reinforce the area later just to be safe.


The hatches are just dry fit for now. I won't screw the hatches in just yet.  Probably will wait until after I paint the deck.  These were purchased for $30 each from Minney's, which is a local chandlery that sells mostly used/surplus/salvaged boat items.


While the holes were cut, I also removed the teak trim on the opposite side.


My plan for now is to extend the top of the stern to cover the outboards.  I believe I mentioned this before and yes I will provide a hatch so I can access the outboards.  So the plan is to relocate the teak trim, but it got pretty damaged from time and probably my removal technique, so we will see!


Finally, I decided to spend some time on putting together my helm chair.  It does not look like it now, but I put it together from different crappy looking pieces I bought at the last boat swap meet.  


The seat itself was in pretty good condition with no tears, but was white and baby blue, so I bought some vinyl spray paint from the auto store and painted it white.  Its really great stuff!  All of the aluminium parts, base, post and seat mount had seen better days with light pitting and tarnished.  I basically brought it back to life with my cordless drill and various wheel attachments and a lot of elbow grease.  The wooden back, I made from some salvaged mahogany.  I will wait to stain/varnish after I build my cabin door.  I probably spent about $20 on the slavaged parts, $6 on the spray paint.  The only thing I bought new was the hinges.  So for about $50 I have a pretty decent helm chair.  Oh yea, I also have some side arm brackets that need to also be cleaned/polished, that I can attach to the chair.  Will probably make the arm rests out of mahogany to match.